You just landed your first real sponsor. Maybe two. Now you're staring at a blank jersey mockup, a stack of logo files in your inbox, and a tournament entry form with "uniform compliance" buried in the fine print — and no one explains what that means.
Get it wrong. You face a penalty on the water. Or your sponsor calls, upset that their logo ended up crammed next to the zipper pull.
Get it right. Your fishing tournament jersey becomes a credibility signal — proof you run a professional program worth backing, and makes you stand out to every serious fishing jersey wholesaler and brand partner in the industry.
This guide covers:
1.The logo placement rules from B.A.S.S., FLW, and MLF
2.A sponsor-tier layout system you can hand straight to your printer
3.How real tournament anglers manage layouts with two logos or twelve
No guesswork. Just a clear system that works.
B.A.S.S., FLW & MLF Official Logo Placement Rules Compared
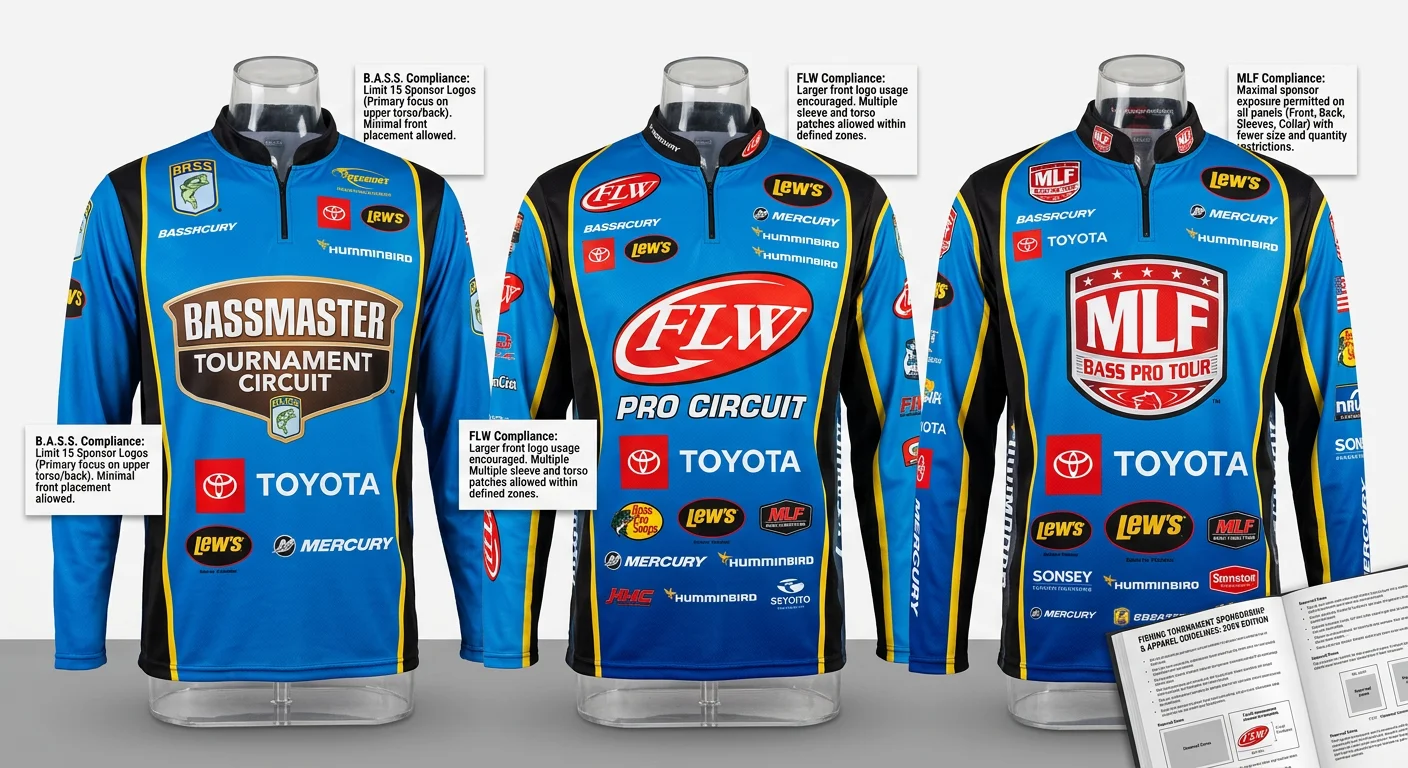
Here's the uncomfortable truth most anglers miss until it's too late: the three major tournament circuits don't share a unified rulebook. Each league handles sponsor logo compliance in its own way — and in some cases, the rules are barely written down at all.
That gap is where anglers get burned.
Before you finalize your fishing tournament jersey layout, know what each organization requires, what they stay silent on, and how to handle those gaps with a clear head.
What Each League Requires
FLW (now folded into MLF's structure, but rules still referenced in active tournaments):
FLW has the most specific language of the three. Key points:
The FLW logo is mandatory on all pros during competition hours — no exceptions, no workarounds
Placement points to the chest or upper torso for broadcast visibility, though no exact size appears in public documents
Exclusive category restrictions kick in on Days 3 and 4. Sponsors in these categories — outboard motors, marine electronics, automotive oil, boats, sunglasses, or POV cameras — block you from showing a competing brand's logo in the final rounds
Co-anglers face fewer restrictions. Tobacco product logos are off-limits across the board
The tournament director handles enforcement, with broadcast compliance as the main standard
This matters for your sublimation fishing jersey design. Final-day gear changes aren't always possible. Plan your layout around the most restrictive day, not the most flexible one.
MLF Bass Pro Tour (2026 season):
MLF's current documentation stays quiet on jersey logo rules. The league's published focus has shifted hard toward technology — sonar limits, transducer counts, forward-facing restrictions. Logo placement gets no detailed treatment.
The working benchmark across pro tours: a primary chest logo of 3–4 inches in the broadcast zone. This standard comes from television production needs, not written rule enforcement. A logo that can't be read during a camera pan will get noticed — first by producers, then by sponsors.
For tournament angler uniform guidelines where MLF doesn't specify: default to what looks clean on camera. That's the real standard.
B.A.S.S. / Bassmaster Elite Series:
B.A.S.S. doesn't publish detailed logo placement dimensions in public documents. The industry benchmark used across Elite Series-level competition:
1.Primary chest logo: maximum 4 inches (H) × 12 inches (W)
2.Back and shoulders serve as secondary placement zones
3.Contact the tournament director for the current compliance PDF — rules get updated each season
The Practical Takeaway
League | Mandatory League Logo | Size Specified | Category Exclusions | Best Source |
|---|---|---|---|---|
FLW | Yes — chest/upper torso | No | Yes (Days 3–4) | FLW archives / tournament director |
MLF Bass Pro Tour | Not documented | No (3–4" industry benchmark) | Not documented | MLF official site |
B.A.S.S. | Not confirmed in public docs | ~4"H × 12"W (industry norm) | Not confirmed in public docs | Contact B.A.S.S. direct |
The safest approach across all three circuits: treat the 3–4 inch chest zone as locked in for your title sponsor , keep the mandatory league logo visible and clear, and pull the current rulebook from the tournament director before you submit your design files.
Rules shift between seasons. A jersey sponsor placement template that passed compliance last year may not pass this year. Check before you print.
Sponsor Tier Hierarchy & Jersey Placement Zones (Annotated Diagram)
Every square inch of a fishing tournament jersey carries a dollar value — and your sponsors know it.
The problem isn't design taste. Most anglers treat their jersey like a bulletin board: stick the logos where they fit, hope nobody notices the hierarchy. Sponsors notice. Tournament directors notice. And the co-sponsor whose logo ended up on the left hip while the smaller brand got center chest? They'll notice on the drive home.
Here's the placement system that works — built around sponsor tier logic, not aesthetic instinct.
The Four-Tier Placement Framework
Tier 1 — Title / Presenting Sponsor
Center front chest. That's the non-negotiable position.
Place it below your team crest or collar, centered on the body. Target width: 3–4 inches . This zone appears in every broadcast frame, every handshake photo, and every weigh-in shot. Your title sponsor paid for visibility. This position delivers it.
Tier 2 — Co-Sponsors / Secondary Sponsors
These logos live in two zones: the upper left and right shoulder areas on the front, or below the title sponsor on the chest if shoulder space is limited. Size benchmark: 2.5–3.5 inches wide .
Got two co-sponsors? Place them evenly across the left and right shoulder zones. Uneven placement reads as a hierarchy — even when there isn't one.
Tier 3 — Supporting Sponsors
Sleeves are your Tier 3 territory. Stack logos top to bottom. Use 1.5–2.5 inches in height per logo . Max three logos per sleeve — don't push past that. Beyond three, logos shrink below readable size and sponsors start asking questions.
Collar and hem patches belong here too. Keep them at 1–1.5 inch max height for league patches, team identifiers, or small supporting brand marks.
Tier 4 — Manufacturer / Performance Brand
Right chest, centered between the collar and the side seam. Industry standard width: 2.33 inches maximum . This spot shows brand partnership without competing against sponsor placement. It's expected. Leave room for it.
The Clearance Rule Nobody Talks About
Logos need breathing room. The minimum buffer between any two placement zones: 0.5–1 inch of clear space . Go below that and logos blend together under compression fabric, under water, and under broadcast lighting.
On the back panel, keep at least 0.5 inches of clearance between your name/number block and any secondary sponsor graphic. The name zone tops out at 4-inch max letter height — protect that space.
The Annotated Zone Map (Send This to Your Printer)
Use this grid as your jersey sponsor placement template when submitting design files:
Zone | Position Reference | Recommended Size |
|---|---|---|
Center Front Chest | Below collar / team crest | 3–4" wide (Title Sponsor) |
Left Chest | 6–8" down from shoulder-collar seam | Team crest / small logo |
Right Chest | Centered, collar to side seam | 2.33" max (Fishing Tournament Jersey Manufacturer) |
Upper Left/Right Shoulder | Shoulder zone, front | 2.5–3.5" wide (Co-Sponsors) |
Upper-Mid Back | Full back panel, post-shoulder | Large sponsor graphic |
Lower Back | Below name/number block | 2.5–3.5" wide, 0.5" clearance |
Sleeve Bands | Vertical stack, per sleeve | 1.5–2.5" H, max 3 logos |
Collar / Hem Patch | Edge placement | 1–1.5" max height |
Buffer Zones | Between all logo zones | 0.5–1" minimum clearance |
Hand this grid to your sublimation fishing jersey printer along with your logo files. It cuts out the back-and-forth. The printer sees where each asset lands. The design goes to press clean.
One more thing: build your fishing jersey mockup layout around the most restrictive placement first — your title sponsor. Lock that position. Lock the size. Then fit everything else around it. The hierarchy isn't just about looks. It's about making sure every sponsor feels their investment was respected.
Recommended Logo Dimensions & Print File Specifications
Printers don't guess. They print what you give them. Blurry files print blurry logos. Undersized artwork prints undersized logos. A sponsor who paid good money to be on your performance fishing shirt custom will spot every pixel of that mistake.
Here's the spec sheet that kills the guesswork.
Print-Ready Dimensions by Jersey Zone
These numbers turn the placement zones from the previous section into real file requirements. Send these to your designer before they open a blank canvas.
Jersey Zone | Physical Size (inches) | Print File Resolution |
|---|---|---|
Title Sponsor (Center Chest) | 3.0–4.0" wide | 900–1200 px @ 300 DPI |
Co-Sponsor (Shoulder Zone) | 2.5–3.5" wide | 750–1050 px @ 300 DPI |
Supporting Sponsor (Sleeve) | 1.5–2.5" height | 450–750 px @ 300 DPI |
Fishing Apparel Manufacturer Logo (Right Chest) | 2.33" max wide | ~700 px @ 300 DPI |
Collar / Hem Patch | 1.0–1.5" height | 300–450 px @ 300 DPI |
File Format Requirements for Dye Sublimation
Dye sublimation fishing shirt printing has a strict format standard. Raster files break down as you scale them up. On a UPF fishing tournament shirt , fabric stretch makes that breakdown even worse.
Follow this format list:
Primary format : Vector files — These scale clean at any zone size, no quality loss
Backup raster format : PNG with a transparent background, minimum 300 DPI, zero compression
Color mode : RGB for dye sublimation fishing shirt printing. Not CMYK. Sublimation ink works from RGB — CMYK files cause color drift
Fonts : Convert all type to outlines before you submit. Font substitutions look fine on your screen and ruin the final print
ICC profiles : Embed them. Your printer's color calibration relies on it
Dark Fabric Contrast Rules
Most fishing tournament jerseys run dark — navy, black, charcoal. That color choice touches every logo on the shirt.
On dark fabric, ask for white or light-colored logo versions with a clear outline. On light fabric, dark borders or drop shadows stop logos from blending into the base color. The minimum contrast ratio for logos to stay readable under broadcast lighting and direct sun: 4.5:1 — that's the WCAG AA standard, the same one used for screen readability.
Collect both a light and a dark version of each sponsor's logo file. You'll need both versions before the season wraps.
Real-World Sponsor Layout Cases: 2-3, 5-8, and 10+ Logos
Three logos is a solved problem. Ten logos is a negotiation. Here's how to handle both — and everything in between.
Case 1: 2–3 Sponsors — Clean, Fast, Camera-Ready
This is the easiest layout to get right. It's also the easiest to ruin by overthinking it.
Lock the title sponsor at center chest. Target 3–4 inches wide . That spot shows up in every weigh-in photo, every broadcast pan, every handshake on the dock.
Put your one or two secondary sponsors on the sleeves or shoulder zones. 2 inches wide , one per side, with at least 1-inch clearance from the seam. The back stays clean — name, number, nothing else.
The visual logic is simple. 60% of the jersey's attention lands on that chest zone. Two sleeve logos split the remaining 40%. Sponsors feel the difference between chest and sleeve placement. They may never say it, but they notice.
Keep spacing at 0.5–1 inch between logos across the board. Two or three marks on a jersey means you have room to breathe. Generous white space reads as confidence, not emptiness.
Case 2: 5–8 Sponsors — Managing Visual Weight Without Losing Hierarchy
Most competitive anglers hit this range after two or three seasons of building their program. It's also where layouts start falling apart.
The framework:
1 title sponsor — center chest, 3–5 inches. Not up for debate.
2 co-sponsors — upper shoulder zones, front, 2–4 inches each
2 upper-back logos — placed 4 inches below the collar, same tier
2–3 sleeve logos — stacked in a column, 1–2 per side, max 4×4 inches each
That covers 7–8 logos with clear space between every zone. Chest and upper back carry 60% of the visual weight . Shoulders and sleeves take the remaining 40%.
One rule that saves every layout at this count: align everything to the center axis. Off-center logos don't just look sloppy. They tell sponsors the hierarchy wasn't thought through.
Past six logos, rotate the overflow to your away kit or practice gear. Don't stack eight marks onto one jersey. A logo that shrinks below readable size isn't a sponsorship anymore — it's just background noise.
Case 3: 10+ Sponsors — Rotation Over Cramming
Ten sponsors on one fishing tournament jersey isn't a design challenge. It's a contracts challenge wearing a design disguise.
Here's the layout that holds at this count:
Block | Logos | Size Range | Minimum Gap |
|---|---|---|---|
Center Chest | 1 | 3–5" | 1" from seams |
Upper Back | 3 | 4–6" total span | 0.5–1" between |
Both Sleeves | 6 | 1–4" stacked | 0.25" gutters |
Lower Back / Collar | 3+ | 1–3" | 1" from name block |
The math caps at 10–13 logos per jersey. That works — but every zone needs to be used with discipline, and sublimation printing needs to handle the full-panel layout in a single pass.
Programs with more than 10 sponsors should run modular rotation across kits . Core sponsors go on the tournament jersey. Secondary and tertiary sponsors rotate across practice gear, warmup jackets, and secondary sets. This keeps your top-tier sponsors' exclusivity intact. It also honors every partnership agreement without cramming everyone onto one garment.
One hard boundary: keep a 1-inch exclusion zone around your name and number block. No sponsor graphic crosses that line. Tournament directors enforce it. Sponsors respect it. Plus, it keeps your jersey readable from the weigh-in stage at 40 feet.
Sponsorship Contract Clauses for Logo Position & Negotiation Leverage
Most anglers shake hands on a sponsorship deal and call it done. Then the jersey comes back from the printer. The sponsor sees their logo on the left sleeve instead of center chest. The phone rings.
A contract clause prevents that call.
Logo position isn't a design decision you sort out at the printer. It's a legal term you lock in before anyone sends a check. Here's how to build those terms — and how to use them in negotiation.
The Four Clauses That Matter
1. Position and Size, Named in Detail
Skip "prominent placement." Write the zone, the dimensions, and the orientation.
A clean clause looks like this: "Sponsor logo shall appear on the center front chest, minimum 3 inches wide × 2.25 inches high, in full color per approved brand files." That's it. Short. Clear. Nobody argues about what "prominent" means when the contract says 3 × 2.25.
Include color and style terms too — approved palette, light or dark version, outlined or flat. Cover it once in writing. Done.
2. Asset Delivery and File Standards
The sponsor must deliver current vector files — before the production deadline. Add this line too: outdated or non-vector files that need rework are the sponsor's cost to fix, not yours.
This protects you when a sponsor sends a 72 DPI JPEG two days before your sublimation fishing jersey goes to press.
3. Category Exclusivity with a Defined Cure Period
A sponsor buying exclusivity in a product category — tackle, marine electronics, sunglasses — needs that category named in writing. Also add a remedy clause: if league rules block the agreed placement during competition (e.g., FLW's Days 3–4 category restrictions), the remedy is logo repositioning or a prorated refund, not a full contract breach.
Standard industry benchmark:
- 30-day cure period before any penalty triggers
- 50% refund if the placement can't be honored and no acceptable alternative exists
4. Non-Competing Third-Party Rights
You need the right to wear non-competing logos in secondary zones. A sponsor in the marine electronics category has no valid claim over your fishing apparel manufacturer's mark on the right chest, or a fishing line brand on your sleeve. State it in the contract: "Endorser retains the right to display non-competing sponsor marks outside the primary placement zone."
Define "competing" by product category. Leave everything else open.
Negotiation Leverage by Sponsor Tier
Sponsor Tier | Negotiating Position | What to Offer |
|---|---|---|
Title Sponsor | They hold leverage — use it to get production costs covered | Center chest lock-in + broadcast visibility guarantee |
Co-Sponsor | You hold leverage — zone scarcity is real | Upper shoulder zone + social media logo tag package |
Supporting Sponsor | Price the sleeve zone against your reach numbers | Sleeve placement + tournament recap content |
A title sponsor covering all production and embroidery costs is standard in structured apparel deals — use that as your starting point. Push back comes? Offer a visibility guarantee: broadcast-facing placement on your great fishing Jersey custom , plus a clickable logo in your post-tournament digital content.
Limit proof revisions to two rounds maximum . Put that in the contract. Open-ended revision cycles eat your weeks and your printer's budget. Two rounds, ±0.25 inch layout tolerance absorbed by the vendor, and the file goes to press.
One last point: sponsors who care about logo placement will respect a team that has written standards for it. Bringing a jersey sponsor placement template and a clause framework to a negotiation doesn't make you difficult. It makes you someone worth sponsoring again next season.
Pre-Tournament Compliance Checklist & Print Submission Workflow
A jersey doesn't fail compliance review at the weigh-in. It fails three weeks earlier. Someone submitted the wrong file format. Nobody caught it.
Here's the workflow that keeps your fishing tournament jersey clear of that problem.
Submission Deadlines & Logo Limits
B.A.S.S. requires compliance review submissions 21 days before the event. MLF timelines run 14–30 days, depending on the circuit. Miss that window and you're reprinting on your own schedule — and your own dollar.
Build around these hard limits before you finalize anything:
Maximum logos per jersey : 8–12 total (B.A.S.S./MLF standard)
Sleeve maximum : 4 logos per side
Minimum clear space between any two marks: 0.25 inches
Print Submission Checklist
Before your dye sublimation fishing shirt file goes to press, run every item on this list:
Flat-layout PDF prepared with all logos placed at final dimensions
Vector files attached — or outlined for every sponsor mark
Color mode confirmed as RGB for sublimation printing
Left/right sleeve logos symmetrical in tier and vertical position
Contrast tested — polyester blends shift color 10–15% from screen to fabric. Request a physical test swatch before full production runs
Compliance PDF emailed to tournament director. Keep that confirmation for weigh-in
Lead time : 2–4 weeks for performance fishing apparel custom . Minimum order quantity runs 6–12 units.
Send the flat-layout PDF plus all vectors to the compliance officer in one package. Keep the reply in your inbox. That email is your proof of submission if anything gets questioned on tournament day.
Conclusion
You showed up with sponsors. Now show up compliant .
Getting your fishing tournament jerseys right isn't just about looking sharp on the water. It's about protecting the sponsor relationships you worked hard to build. Walk into every tournament knowing your jersey will pass inspection before you make a cast.
Here's what most anglers learn the hard way. A title sponsor who can't find their logo. A co-sponsor squeezed onto a sleeve at 1.5 inches. A jersey that breaks MLF's chest-zone clearance rules. These aren't design mistakes. They're trust mistakes. And they cost real money.
Use the comparison table, the placement zone diagrams, and the real-world layout cases in this guide. Come back to them every time you place a print order. They're your checklist, not a one-time read.
Then send your mockup to your sponsors before it goes to the printer.
One extra approval email now. Zero awkward conversations later.