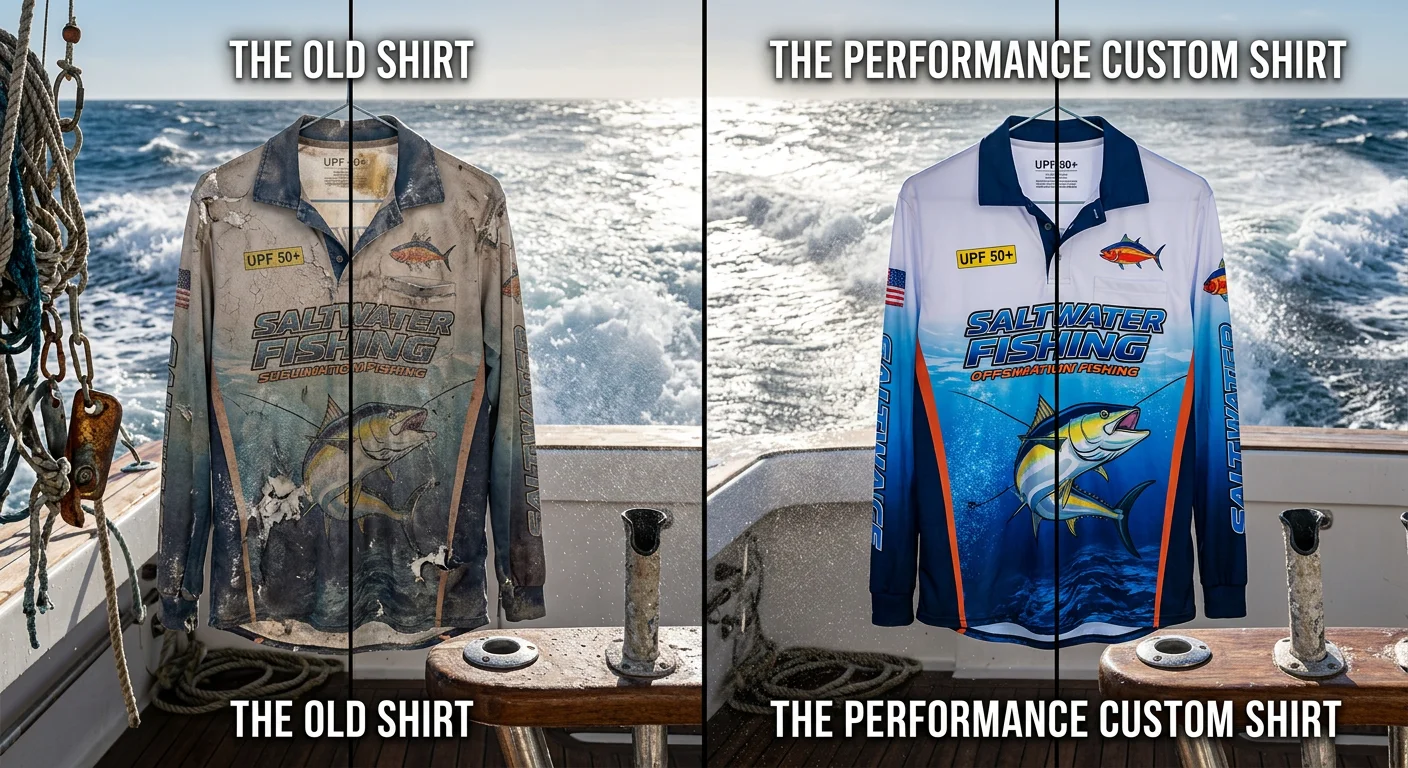
Salt water doesn't forgive shortcuts. One season on the open water — dodging spray, sweating through humid offshore air, grinding through back-to-back tournament days — and a bad custom fishing shirt will fade, crack, and fall apart before your rod holder does.
The problem isn't customization itself. Most guides treat saltwater fishing apparel like any other branded tee. It isn't.
Pick the wrong fabric blend and your shirt falls apart fast. Choose the wrong print process and the logo peels after a few washes. Place a logo where it sits under a life vest buckle and you've wasted real money. These mistakes add up.
This guide covers every decision that matters. You'll learn how to pick a UPF 50+ fabric built to resist salt corrosion. You'll also see why sublimation fishing shirt printing beats cheaper alternatives that won't survive a single offshore season.
Fabric Selection Matrix for Saltwater Fishing Shirts
Here's a fact most custom apparel vendors won't tell you: the ocean is working hard to destroy your shirt.
Salt crystallizes in the weave after every wave splash. UV intensity on open water runs 25–40% higher than on land. Add sweat, fish slime, and back-to-back tournament days — you've built one of the most punishing textile environments on the planet. Choosing your fabric isn't a style decision. It's an engineering decision.
Here's what works, what doesn't, and why.
The Core Fabric Matrix: Four Materials, One Clear Winner
Fabric | Blend Ratio | Weight (gsm) | UPF Rating | Salt Resistance |
|---|---|---|---|---|
100% Polyester | Single component (±5% cationic modifier) | 120–150 gsm (inshore/summer); 150–180 gsm (offshore/heavy surf) | ≥ UPF 50+ | Color shift ΔE ≤1.0 after 48h salt spray; strength loss ≤10% |
Poly/Spandex Blend | 92–95% Poly + 5–8% Spandex | 130–150 gsm (high-movement: casting, paddling, rigging) | ≥ UPF 50+ at 20% stretch | AATCC 107 seawater colorfastness ≥ Grade 4; elongation loss ≤15% after 24h salt soak |
Nylon/Poly Blend | 30–50% Nylon + 50–70% Poly | 140–200 gsm (deck jackets, shell layers) | UPF 40–50+ | Tear strength retention ≥85% after 72h salt spray |
Cotton/Poly Blend | Poly ≥60% if used at all | 120–150 gsm (inner layer only) | Not recommended as primary UV layer | Absorbs salt crystals; fades fast after 2–3 sea washes; dimensional change up to 5% |
The bottom line : For any serious saltwater fishing shirt — tournament, charter, or offshore — 100% polyester or a 92/8 poly/spandex blend is your best defensible choice . Cotton blends belong on the dock, not on the boat.
The Four Performance Standards That Matter
UPF Protection (Non-Negotiable)
Your long sleeve fishing shirt must hit UPF 50+, blocking ≥98% of both UVA and UVB radiation. Most buyers miss one key detail: request test data showing UPF performance after 20+ home washes — or at least 5 industrial wash cycles. For stretch fabrics, demand testing at 15–20% extension. UPF ratings measured on flat, unstretched fabric mean nothing in an active fishing environment.
Quick-Dry Performance
A quality moisture-wicking fishing apparel fabric should hit these benchmarks:
- Water spread time: ≤3 seconds for a 0.2ml droplet
- Horizontal wicking diameter: ≥30mm within 30 seconds
- Full dry time (100% → 10% moisture content): ≤20 minutes at standard lab conditions
Ask your Fishing Shirts supplier for Y-shaped, cross-shaped, or hollow-core polyester fiber cross-sections . These structural shapes create capillary channels that pull moisture away from skin far faster than standard round fibers.
Salt Corrosion Resistance
This is where budget fabrics fail. Ask your supplier to run ASTM B117 salt spray testing (5% NaCl solution, 35°C, 48–72 hours) and provide documented results showing:
- Breaking strength retention ≥90%
- Color ΔE ≤1.0 (critical for dark tournament fishing shirts)
- No bubbling, cracking, or surface tackiness
For sublimation fishing shirt printing, push for an internal cycle test: 10 rounds of saltwater soak and air-dry, with before/after photographs of the print. That visual record tells you more than any single lab number.
Anti-Microbial Treatment
Two days offshore without a wash means your fishing shirt fabric needs to fight odor at the fiber level. Silver-ion finishes — Silvadur and Polygiene are the industry benchmarks — should deliver:
- ≥99% bacterial reduction (Staphylococcus aureus, E. coli) at 24 hours
- ≥90% inhibition rate retained after 30 wash cycles
Order anti-microbial fishing shirts? Request the ASTM E2149 or JIS L 1902 test report, plus OEKO-TEX Standard 100 certification. Certification matters most for shirts worn against skin during long tournament days.
One Stitching Detail Most People Overlook
Your fabric choice goes no further than the thread holding it together. Specify 100% polyester high-tenacity thread (Tex 18–27) for all seams. Standard cotton-wrapped thread breaks down fast in saltwater. The same salt crystallization that destroys weak fabric blends will eat through weak thread at cuff seams and hem edges first. Get documented proof that your seam thread holds ≥90% tensile strength after a 24-hour saltwater soak.
That one spec change is the difference between a shirt that lasts two seasons and one that falls apart after ten trips.
Print Process Durability in Saltwater Conditions: Sublimation vs. DTG vs. Screen Print
Three anglers walk off a charter boat after 90 days of tournament season. Same shirt design, three different print processes. One shirt still looks sharp. Two don't. That's not a hypothetical — it's what happens when you use the wrong print technology in a saltwater environment.
It all comes down to one core question: where does the ink live?
Why Ink Location Determines Everything
Sublimation fishing shirt printing works in a way no other process does. At 190–210°C, dispersed dye turns to gas and drives straight into the polyester fiber. It cools and locks inside the fiber structure — not sitting on top of it.
That's the entire game.
Salt spray can't peel what isn't on the surface. UV radiation can't crack a coating that doesn't exist. That's why sublimation printing on 100% polyester beats every alternative in saltwater conditions — no exceptions.
DTG (Direct-to-Garment) digital printing does the opposite. Water-based pigment particles bond to a surface resin coating through a pretreatment layer. The ink film sits on top of the fabric. That resin layer is the first target for salt crystallization and UV exposure — it goes brittle, develops micro-cracks, and starts flaking.
Traditional screen printing with plastisol or heavy paste pushes things further in the wrong direction. Ink layers can reach 20–40 microns thick on the surface. More surface exposure means faster breakdown in high-salt, high-UV conditions.
The Weathering Data: 30 to 90 Days on Open Water
Here's how the three processes perform in saltwater conditions, based on real testing benchmarks for 100% polyester fishing shirts:
Print Process | Ink Mechanism | After 30-Day Salt Exposure | 90-Day UV Color Shift (ΔE) | Best Use Case |
|---|---|---|---|---|
Sublimation | Dispersed dye locked inside polyester fiber at molecular level | Zero peeling, zero powdering; color retention ~92–97%; ΔE ≈ 1.0–2.0 | ΔE < 2.5 at high UV (6–8 hrs daily); top-grade dye systems hold ΔE < 2.0 — invisible to the naked eye | Full-coverage offshore designs, tournament fishing shirts, charter boat team uniforms, gradient fish art |
DTG Digital Print | Pigment + resin film on surface via pretreatment anchor layer | Edge micro-lifting visible in high-abrasion zones (waist, cuffs); color retention ~80–88%; ΔE ≈ 3.0–4.0 | ΔE 3.5–4.5 after 10–15 seawater wash cycles; saturated blues and reds gray out visibly at 1-meter distance | Small chest logos, back numbers, personalized names; rush orders under 30 pieces; avoid large shoulder/back coverage |
Screen Print (heavy paste) | Thick pigment-resin surface layer; no fiber penetration | Salt absorption causes tackiness in folded areas; color retention drops to 65–80%; ΔE ≈ 4.0–6.0 | ΔE > 5.0 within 60 days in tropical UV; saturated colors fade to 60–70% of original at 90 days; cracking and peeling escalate | Single or dual-color club names on fixed chest/back areas only; not recommended for offshore or tournament-level shirts |
What ΔE means in practice : A ΔE below 2.0 is invisible to most human eyes. A ΔE above 3.5 is easy to spot. Above 5.0, the color loss is obvious enough to make a team shirt look worn out by mid-season.
Choosing the Right Process
Sublimation is your default choice if:
- Your fabric is ≥90% polyester (which it should be — see the fabric section above)
- You need full-coverage designs: offshore fish illustrations, gradient colorways, large sponsor logos, inshore species art
- The shirts face saltwater exposure every day — offshore trolling, jigging, back-to-back tournament days
- You're ordering fishing team shirts custom for a charter operation or competitive circuit where consistent branding needs to hold up through a full season
DTG makes sense only when:
- Your order is under 30 pieces with high design variation (different names, numbers, or artwork per shirt)
- The print area is small and sits away from high-friction, high-salt zones
- You need fast turnaround and accept the trade-off in long-term color retention
Screen printing is worth considering only if:
- Budget is the primary constraint
- The design uses one or two solid colors at most
- Shirts are for short-duration events, not extended offshore seasons
The One Detail That Kills Sublimation Quality
Choose sublimation and you're on the right track. But one fishing shirt supplier shortcut can still wreck the result: under-temperature pressing .
Proper dye sublimation needs 190–210°C with a consistent dwell time. Some fishing shirts suppliers press at 170–180°C to protect cheaper fabrics or speed up production. At that lower temperature, the dye only moves part of the way into the fiber. The portion left at the surface behaves just like DTG — and breaks down just as fast.
Before committing to a full run of sublimation fishing shirt printing , request a sample and run a simple field test. Soak the sample in saltwater 10 times, then air-dry it in direct sun each time. Photograph before and after. The test costs almost nothing. It catches the most common quality failure before it costs you a full order.
5 Saltwater Fishing Shirt Design Templates: Style Guides, Color Codes,Layout Rules Your Printer Can Use
Most custom fishing shirt guides stop at "pick a cool fish graphic and add your team name." That's fine for a lake tournament. It's not fine for saltwater.
The ocean changes every design decision. Color contrast affects open-water visibility. Sponsor logo placement has to clear a life vest. And some colors hold through a full offshore season — others wash out by week four. The five templates below are built for saltwater environments. Each one includes Pantone-level color specs, layout dimensions, and fabric notes your production team can work from directly.
Style 1: Offshore Blue Water — Deep-Sea Visibility First
Design objective: Maximum contrast at sea + emergency recognition from distance
This template is built for open-ocean use — bluewater trolling, offshore jigging, multi-day trips. The color logic borrows from rescue equipment, not fashion.
Color Palette:
- Base: Deep navy — Pantone 2965C / RGB 0-40-73
- Contour accent: Ocean blue — Pantone 2995C / RGB 0-163-224
- High-visibility trim: White (Pantone White) + signal orange — Pantone 1655C / RGB 255-87-0
The orange isn't decorative. At distance on open water, navy blends into the ocean. A 3–4 cm continuous orange band around the upper arm — running 360° front to back — raises your recognition profile the same way a PFD does. Keep it on both arms.
Layout:
- Front: Bathymetric contour lines running lower-right to upper-left, covering 40–50% of the front panel
- Back: Full navy base, upper half layered with contour lines plus customizable GPS coordinates. Tournament teams often place their home port coordinates here.
- Sleeves: One side — marlin or sailfish outline in white; other side — team or boat name
Fabric/Print Notes: UPF 50+ polyester, 140–160 gsm. Full sublimation print. Add reflective tape on shoulder seams and center back spine.
Style 2: Inshore Redfish — Low Profile, High Function
Design objective: Environmental camouflage + reduced fish disturbance in shallow, clear water
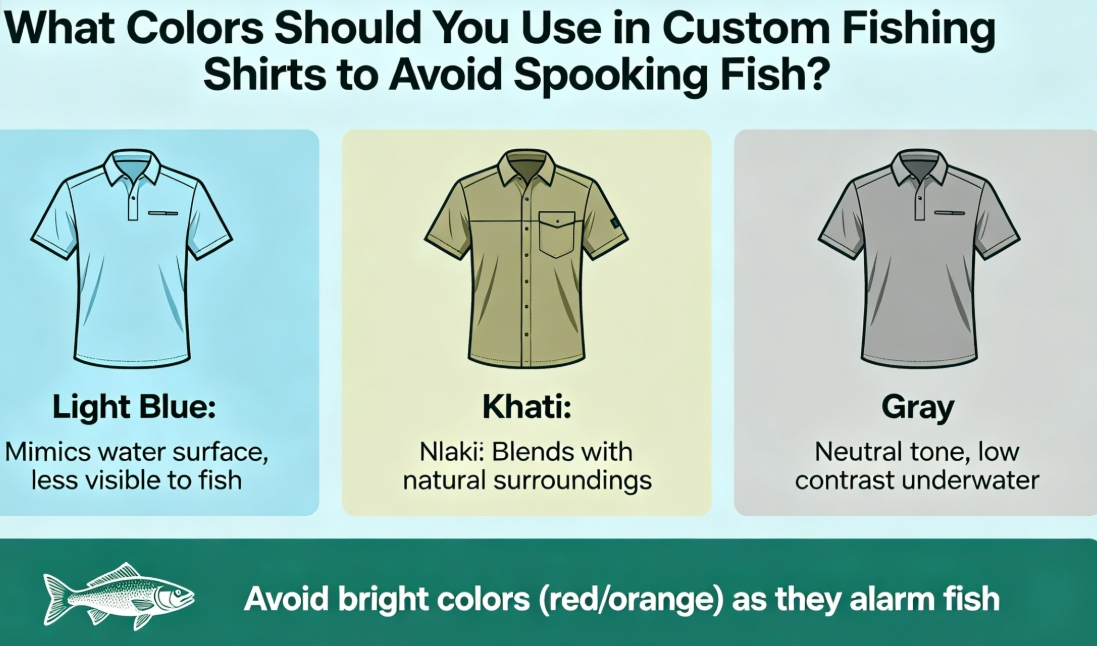
Inshore fishing is a different game. You're wading grass flats, poling a skiff within 20 feet of a nervous redfish. High-contrast colors spook fish. Keep everything muted.
Color Palette:
- Base: Khaki sand gray — Pantone 424C/425C blend, neutral warm gray
- Scale accent: Rust red — Pantone 7608C / RGB 146-73-52 (desaturated, leaning brown-red)
- Side panel: Antique bronze — Pantone 876C or matte equivalent
The entire color system sits in the L* 40–60 range on the Munsell scale — mid-to-low lightness, no high-contrast blocks. Keep any logo in deep brown or dark gray. Not white.
Layout:
- Front: Left chest "scale gradient band," 10–12 cm wide, fading upward — present but not prominent
- Back: Full scale texture above the waist, saturation pulled back 30–40% to read like wet sand or reef structure
- Side panels: 8–10 cm bronze stripe from underarm to hem — works as a slimming visual and doubles as a guide company brand color
Fabric/Print Notes: Nylon-poly blend with mesh back panel for guide-level all-day mobility. Skip large yellow zones — they attract insects. Small olive green at cuffs and cap brim works as a low-key accent. Add a hidden zip chest pocket for guide licenses and permits.
Style 3: Tournament Competition — Camera-Ready and Sponsor-Optimized
Design objective: On-camera readability + structured sponsor logo placement
Tournament fishing shirts live in front of cameras. Award ceremonies, hero shots, weigh-in footage — your custom fishing shirt is a billboard. Design it like one.
Color Palette:
- Base: Bright white or fluorescent yellow — Pantone 803C / RGB 255-249-0, covering 70%+ of surface area
- Outline/dividers: Black — Pantone Black C, used for block separation and text borders
- Team accent: Primary team color, capped at 10–15% of total surface area
Sponsor Logo Placement Grid:
This is the section most tournament teams get wrong. Life vests cover 40% of the front torso. Cameras frame from mid-chest up. Place your sponsor real estate with that in mind:
Zone | Dimensions | Purpose |
|---|---|---|
Front chest center | 8–9 cm from neckline; 14–18 cm height window | Primary sponsor block |
Left chest | 7 × 7 cm reserved area | Team badge or scaled sponsor logo |
Both sleeves | Starting 4–5 cm below shoulder point, 18–20 cm length | Secondary sponsor row |
Upper back center | 40–50% of shirt width; 15–20 cm height | Primary sponsor large format |
Use a 2 cm grid module for all horizontal and vertical alignment. Sponsors change — and they will. This system lets you swap logos without rebuilding the entire layout.
Name/Number Window: Right chest or lower back — 6–8 cm tall, 18–22 cm wide. Single-color base with variable text layer. The fishing apparel factory changes only the name. The rest of the file stays identical. That's how you manage a 40-angler tournament team without a production nightmare.
Fabric/Print Notes: Polyester-mesh hybrid, 130–150 gsm. Full sublimation for large graphic areas. Fluorescent yellow needs proper dye calibration — verify color output on actual fabric before approving a production run.
Style 4: Charter Boat Brand Uniform — Professional Identity, All-Day Durability
Design objective: Brand authority + wearable across client-facing and on-deck contexts
Charter boat shirts serve two purposes: looking sharp when clients step aboard, and holding up through eight hours of rigging, gaffing, and salt spray. The design has to do both.
Color Palette & Structure:
- Base: Navy blue — Pantone 296C, 70%+ coverage
- Boat name typography: Bold arched text across the upper back, following the shoulder line — 6–8 cm letter height, sans-serif bold with slight italic lean
- Background texture: Low-opacity compass rose or latitude grid at 10–15% transparency, front lower chest or center back — 18–22 cm diameter
Collar Options:
- Polo collar — client arrival, dock presence, photography
- 1/4-zip stand collar — active deck work, wind protection, easy on/off over a wetsuit or rash guard
Logo/Embroidery Detail: Left chest shield or crest embroidery in 2–3 flat colors, 6–8 cm wide. Embroidery beats sublimation here. It won't crack under constant salt abrasion at the chest, and it projects a premium feel that matters when clients are comparing charter options. Use sublimation for the back graphic and sleeves to keep the garment weight down.
Identification Detail: 1–2 thin boat color accent lines at cuffs and collar edge. Simple. Enough to distinguish your crew from guests at distance.
Fabric/Print Notes: UV-resistant polyester piqué or birdseye knit, UPF 50+, 160–180 gsm. This runs heavier than a tournament shirt — offshore deck work demands it.
Style 5: Tactical All-Black Night Fishing — Low-Key Performance
Design objective: Minimal visual profile + heat management + safety reflectivity after dark
All-black sounds simple. On saltwater, it's the most demanding colorway to execute. Dark fabric absorbs heat — the construction has to compensate.
Color Palette:
- Primary: Matte charcoal — Pantone 419C
- Secondary: Dark slate gray — Pantone 432C
- Texture: Tone-on-tone jacquard or emboss within the same color family, pattern lines ≤ 3 mm wide, brightness variance under 10%
Skip large high-contrast logos. Any branding should be in dark gold or dark gray — subtle, intentional, readable only at close range.
Hidden Reflective System:
This is the detail that separates a well-designed all-black fishing shirt from a basic dark tee:
Locations: Shoulder seams, center back spine, rear sleeve cuff, side hem
Spec: 5–8 mm reflective piping — near-invisible in daylight, activates under direct light at night
Cap brim: Single reflective strip on the underside edge — helps fishing partners locate each other on a dark deck
Heat Management for Dark Fabric:
Dark colors absorb far more solar radiation than light ones. You can't offset this with color choice alone, but you can engineer around it:
Select polyester yarns with a cool-touch or cold-feel finish (sometimes labeled as "ice yarn" in Asian manufacturing specs)
Add a mesh ventilation zone across the upper back — a 20–25 cm wide panel works well
Specify hollow-core or cross-section fiber construction to push airflow through the weave
Ask your supplier for fabric lab data showing surface temperature differential compared to a standard polyester baseline. A solid cool-touch finish shows a measurable drop in contact temperature under direct UV exposure. Get the test report before committing to production.
Supplier Tiers: Matching Your Order Size to the Right Production Partner
The biggest mistake fishing teams make isn't choosing the wrong design — it's calling the wrong fishing apparel factory.
A 500-piece tournament order and a 5-piece charter boat trial run need two very different supply chain approaches. Send a small order to an OEM fishing apprel factory built for mass production. You'll get quoted minimums you can't hit, timelines you can't use, and a sales rep who goes silent after your first email. Scale works in one direction. Your supplier strategy has to move with it.
Here's how to match your order volume to the right production model — and what to negotiate at each level.
Tier 1: 3–30 Pieces — Use POD Platforms and Local Quick-Turn Studios
At this volume, traditional OEM fishing shirts factories are the wrong call. Most require 500–2,000 pieces per style minimum. You're not there yet. Trying to push a small order into that pipeline wastes time and money.
The right option for 3–30 pieces is print-on-demand (POD) platforms paired with local quick-turn apparel studios. These are small facilities that stock blanks in UPF 50+ polyester and print to order via sublimation or DTG.
What to expect:
- MOQ: 1–3 pieces
- Price range: $28–45 USD per piece (functional fabric, custom placement print)
- Turnaround: 3–5 days for a digital proof, 7–10 days to your door
- Setup fees: None for digital print runs
The trade-off is real: you pay a higher per-unit cost. That's not waste — it's the cost of testing a design before committing to a bulk run. A charter boat operator who orders 6 sample shirts to test three colorways before a 200-piece run is making a smart investment, not a small one.
One quick note: stick to standard sizing and stock fabric at this tier. Custom sizing or specialty fabric blends require minimum yardage commitments. Those commitments kill the economics of a small order fast.
Tier 2: 50–200 Pieces — Target Small-Batch Sublimation Specialists
This is the sweet spot for fishing club orders, charter boat crew uniforms, and regional tournament fishing shirts. It's also the tier where most buyers overpay or underperform. The reason? They don't know which factories are built for this volume.
You're looking for what the industry calls a "small-batch quick-turn" factory. This production model started in fast-fashion supply chains, but it's now common in performance apparel manufacturing too.
Benchmark specs for this tier:
- MOQ: 30–50 pieces per style per colorway
- Price range: $18–26 USD per piece (full-coverage sublimation, UPF 50+ quick-dry fabric, YKK zippers)
- Sample turnaround: 7–10 days for a physical sample with full print placement
- Production lead time: 10–15 days after sample approval
Evaluating factories at this tier? Ask one specific question: "Can you handle a 100-piece order with three artwork variations in a 12-day window during peak season?" A yes with specifics means you've found the right partner. A vague "we can try" means move on.
Negotiate two things before signing anything:
First, write in two free revision rounds on the artwork layout. Sublimation proofs look different on actual polyester fabric than on a screen. You need room to adjust without paying extra each time.
Second, ask for split-shipment capability. For a custom fishing team shirts order of 150 pieces, you may need 60–70 shirts delivered two weeks before the tournament and the rest after. A factory that splits a run and ships in two batches is worth a marginally higher unit price.
Tier 3: 200–500+ Pieces — Lock In an OEM/ODM Partner with an Annual Framework Agreement
At 200 pieces and above, you have real leverage. Use it.
The best structure here isn't a single large order — it's an annual framework agreement that combines an initial bulk run with planned reorder cycles. This gets you better unit pricing, reserved fabric inventory, and priority production slots during peak season.
What the economics look like:
Order Volume | Estimated Unit Price (USD) |
|---|---|
200 pieces | $15–18 per piece |
500 pieces | $13–16 per piece |
2,000 pieces (annual cumulative) | $12–14 per piece |
Pricing assumes full-coverage sublimation, moisture wicking fishing apparel construction, UPF 50+ polyester, branded labels and packaging. Actual quotes vary by factory and fabric spec.
Here's how the annual framework approach works: you commit to an estimated annual volume of 1,000–2,000 pieces. The factory reserves your fabric colorway and locks in a tiered price scale. Each individual run — 200 pieces here, 150 pieces for a reorder there — gets processed at the contracted rate. No re-quoting from scratch every time.
Production timeline expectations:
- Pre-production sample (PP sample): 15–20 days, covering fabric confirmation and full print placement
- Bulk production: 20–30 days
- Partial early shipment: Negotiate 15–20% of the order to ship first — enough to cover your tournament or first retail drop while the rest of the run finishes
Lock in the sample and version before production starts. Artwork revisions after PP sample approval are expensive and cause delays. Get it right at the sample stage.
The Supplier Vetting Checklist That Most Buyers Skip
Finding a factory that quotes the right price is step one. Confirming they can deliver on saltwater-specific requirements is step two — and most buyers skip it.
Production line capability:
- Confirm they run a dedicated performance sportswear or fishing apparel line — not a standard T-shirt operation that's been reconfigured for your job. Ask to see equipment: interlock machines, 4-needle 6-thread overlock, bonding press, and proper handling for stretch mesh fabrics.
- Request documented test results for: salt spray resistance on hardware (zippers, fasteners) and printed areas; colorfastness ≥ Grade 4 for perspiration, water immersion, and abrasion.
Flexibility and reorder capacity:
- Ask them straight: "Do you hold 10–20% flexible production capacity for existing clients during April–September peak season?"
- Confirm they support split shipments and can turn around a 100–200 piece reorder in 10–15 days once your pattern and fabric are locked in.
- Build a reorder price escalator into the contract: reorder volume increases ≥10% over the previous order, unit price drops 3–5%. Annual cumulative volume crosses agreed thresholds (1,000 or 2,000 pieces), a second discount tier activates.
Compliance documentation:
- OEKO-TEX Standard 100 certification on all fabrics used against skin — non-negotiable for tournament fishing shirts worn in multi-day competition conditions.
- Written confirmation of disperse dye compliance (no banned azo dyes, no restricted heavy metals) meeting EU or US import standards.
- Bonus: ask whether they offer recycled polyester options. It won't affect your current order, but suppliers who already stock rPET fabric tend to be ahead on quality control across the board.
Project communication setup:
- Get a dedicated technical production coordinator — not just a sales contact. This person attends sample review, pre-production meetings, and first-piece confirmation. Your supplier can't name who fills that role before you sign? That's a red flag.
The right factory at each tier isn't the one with the lowest quote. It's the one whose production setup, minimum order structure, and quality documentation match the saltwater fishing apparel spec you've built. Lock in the wrong partner and you'll pay for it by mid-season — in faded logos, blown seams, and a reorder you didn't plan for.
Sample Approval Standards and 3 Critical Design Mistakes to Avoid in Saltwater Custom Fishing Shirts
You've locked in your fabric. Approved your print process. Finalized the design. Now comes the moment most teams rush — and regret.
Sample approval isn't a formality. It's your last line of defense before a bad decision multiplies across 200 units.
The Four-Point Sample Inspection Framework
Movement and Fit Under Load
Put the sample shirt on and simulate actual fishing conditions. Run at least 30 casting motions — full backswing, lateral body rotation, forward throw. Then test overhead reach, deep squat, and side bend.
What you're checking:
- No dead creasing or fabric bunching at the armpits or shoulder blades
- Underarm stretch clearance of at least 4–6 cm at maximum extension
- Full arm raise to ear level with zero binding sensation
Elastic recovery matters too. Pull the fabric at a diagonal angle to 120% of its resting length. Hold for 10 seconds, then release. Recovery should hit ≥90% within one minute. Run this 10 times. Permanent white stress lines or fabric distortion after the cycle means the blend ratio or knit structure is wrong.
Color Accuracy and Wet Transparency
Check your saltwater resistant clothing sample under a D65 standard light box against your target Pantone reference. Color difference (ΔE) should land at ≤1.5 for standard orders — ≤1.0 for high-end tournament fishing shirts. Anything over 1.5 needs re-dyeing before production approval.
Then do the wet test. Soak the sample until saturated, press it flat against your hand, and shine a phone flashlight through from behind. The fabric should show a faint outline at most — no visible skin tone. Wet-state light transmission should increase no more than 15–20% over dry state. For light colorways or women's sizing, this check is non-negotiable.
Print and Logo Adhesion Under Salt Stress
This test catches the failures that don't show up until week six of the season.
Mix a 3.5–5% saltwater solution (35–50g of salt per liter of water). Submerge the printed fabric sample for a full 24 hours. Remove it and air-dry until moisture content drops below 10%. Then take a white cotton cloth and rub the printed area 10–20 times with moderate pressure.
Pass criteria:
- White cloth shows no visible color transfer (grey scale rating ≥ Grade 4)
- Print surface is not tacky or sticky to the touch
- No visible micro-cracking after 4 hours of direct midday sun exposure
For cross-hatch adhesion testing: score a 1mm × 1mm grid pattern across the logo area. Press 3M tape (≥10N/25mm adhesion) over it and pull at 90° in one sharp motion. Zero ink lift across the entire grid — that's the standard. Nothing less passes.
Seam Strength at High-Stress Points
Grip the shoulder seam and side seam with both hands. Pull with firm, repeated tension — 10 pulls minimum. No seam separation. No thread break.
For structural specs, your anti-microbial fishing shirt seams need to meet these minimums: 4-needle 6-thread overlock construction at shoulder and armhole seams, stitch density of 3–4 stitches per cm, and polyester high-tenacity thread with a single-thread pull strength of ≥45N. Suspension points — back hang loops, chest D-rings — need a reinforced base layer plus box-stitch or X-stitch bartack. Not optional.
3 Saltwater Design Mistakes That Cost Teams Real Money
Mistake #1: Dark Fabric That Turns Your Shirt Into a Heat Trap
All-black and deep navy tournament fishing shirts look sharp on camera. On the water, they become a liability.
Dark fabric pulls in far more solar radiation than light colors. Surface temperatures on deep black polyester run 5–8°C higher than equivalent light-colored fabric under the same conditions. Eight hours offshore without shade, that gap matters. Fatigue sets in faster. Heat exhaustion risk goes up. For shirts with TPU membrane layers, sustained heat speeds up material aging.
The fix isn't abandoning dark colors — it's building around the heat load:
Structural venting: Laser-perforate the upper back and shoulder blade zones (0.8–1.2mm holes, 8–12mm spacing). Add breathable mesh panels under the arms and along the side panels from armpit to mid-waist (mesh pore size 0.5–1.5mm, 80–120 gsm weight). This creates active convection without weakening the shirt's structure.
Color architecture: Use a light base — pale gray, khaki, or light blue — with dark graphic elements printed on top. A client set on a dark exterior? Run a "light inside, dark outside" build: a light-colored moisture-wicking inner layer paired with a dark outer shell cut 10–20 gsm lighter than standard weight. That drop reduces total heat retention.
Mistake #2: Cheap Thread That Salt Water Destroys by Mid-Season
Standard cotton-wrapped thread fails in a predictable way in saltwater. Salt crystals form inside the thread fiber after each wave splash and drying cycle. That crystal growth pushes the fiber structure apart from within. After about 90 days of regular salt exposure, the thread turns brittle, frays at stress points, and loses tensile strength fast.
The failure hits where it hurts most — shoulder seams blow out mid-cast, sleeve seams split while lifting a fish, hem lock-stitching unravels on contact.
Write these specs into your purchase contract before production starts:
Thread specification: High-tenacity polyester core-spun thread, Tex 27–40 grade minimum
Surface treatment: UV-resistant and salt-fog resistant thread coating — request the brand name or equivalent performance documentation
Performance threshold: Single-thread break strength ≥45N; after 7-day submersion in 3.5–5% salt solution, tensile strength retention ≥80%
At final inspection, cut seam thread samples from three random garments and run a pull-to-break comparison. Any sample that snaps below spec triggers a full re-stitching requirement on critical seams — or a batch rejection.
Mistake #3: Logo Placement That Interferes With Life Vest Fit
This mistake goes beyond aesthetics. It's a safety issue.
Most fishing shirt mockup templates don't account for PFD geometry. Designers place the main back graphic high on the upper back — right where a standard life vest back panel sits. Front chest logos get scaled up without checking where PFD shoulder straps and buckle hardware land. The result: logos that peel from constant buckle friction, and PFDs that don't sit or fasten right because a thick graphic layer blocks the contact surface.
Build PFD clearance into your design system from the start:
Back logo placement: Map the PFD back panel dimensions (30–40 cm vertical height is standard). Position your main back graphic at least 3–5 cm above the top edge of the back panel, or 3–5 cm below the bottom edge. Keep horizontal logo boundaries at least 3 cm clear of shoulder strap travel paths.
Front logo placement: Left and right chest graphics must clear PFD shoulder strap outer edges by at least 2 cm on each side. Oversized front chest logos should be reduced to ≤5–6 cm height or moved to the right chest or lower front panel.
Mandatory sample verification: At the physical sample stage, put the shirt on with an actual PFD over it. Run the full sequence — fasten all buckles, raise both arms overhead, bend forward at the waist. Every logo area must stay flat, unfolded, and clear of all hardware contact zones before you sign off on production.
One hour on this check at the sample stage saves you from reprinting an entire run — and from putting your team in gear that doesn't fit right when it matters most.
Conclusion
Saltwater doesn't forgive shortcuts — and neither should your custom fishing shirt order.
You now have a clear plan. Start with a 100% polyester sublimation base that handles salt spray. Use dye-sublimation printing that keeps color sharp through a full tournament season. Build your design around the specific waters you fish — not just something that looks good on a mockup template.
The anglers and charter operators who get this right aren't spending more money. They spend it smarter. They lock in the right fabric specs, the right print process, and the right fishing apparel supplier tier — all before a single sample is cut.
Here's your next move:
Pull up your fishing shirt mockup template
Lock in your UPF 50+ fabric spec
Request a salt-wash test swatch from your shortlisted supplier
Don't order 200 shirts based on a screen preview.
One tested sample run protects you from wearing a real, expensive mistake for the next two seasons.